
How to Manage Your Package Promotion Workflows with Cloudsmith

Package promotion workflows are a great way to isolate and protect production repositories, allowing progressive levels of security and permissiveness for development, staging, and production environments.
Once a binary is uploaded to Cloudsmith, it can move from development -> staging -> production, maintaining the integrity of the asset and its provenance trail. This migration takes place entirely within Cloudsmith; there’s no package delivery cost.
This post will talk about:
- The differences between Dev, Staging and Production environments.
- Cloudsmith's package promotion instructions- package copy/move actions
- Complementary features that play nicely with package promotion, including webhooks, quarantining, policy management and upstreaming. These can be used together to create workflows and drive actions.
- A Potential workflow for package promotion
- Policy management that lets you set up policies that serve as prerequisites to package promotion.
Differences between Dev, Staging, and production environments
Typical software development organizations maintain three types of environments: development, stage, and production.
- The Development environment is used for developers early in the software process to see how new features will work, to try out improvements and pull in new dependencies or update existing dependencies.
- The Staging environment is used for testing integration and is a production-like environment that allows user creation without impacting production data. Only whitelisted IPs typically have access to Staging.
- The Production environment is what end users are using on a live system.
Package Copy/Move Actions (API/CLI)
Cloudsmith's package promotion workflows are powered by features to copy and move packages between repositories, usually for promoting immutable versions of packages between separate build, test, staging and production pipelines. The package that was verified in build is the same package in production when it gets promoted to there. Cloudsmith facilitates the automation of copying and moving packages using our command line interface (CLI).
When you promote a package using the Cloudsmith CLI’s copy functionality (e.g., from Dev to Staging), Cloudsmith automatically rescans the package for vulnerabilities and license issues. This ensures that only secure and compliant artifacts are promoted through the pipeline, with policies applied to block or quarantine packages that fail these checks.
Let's see an example of moving a package in action:
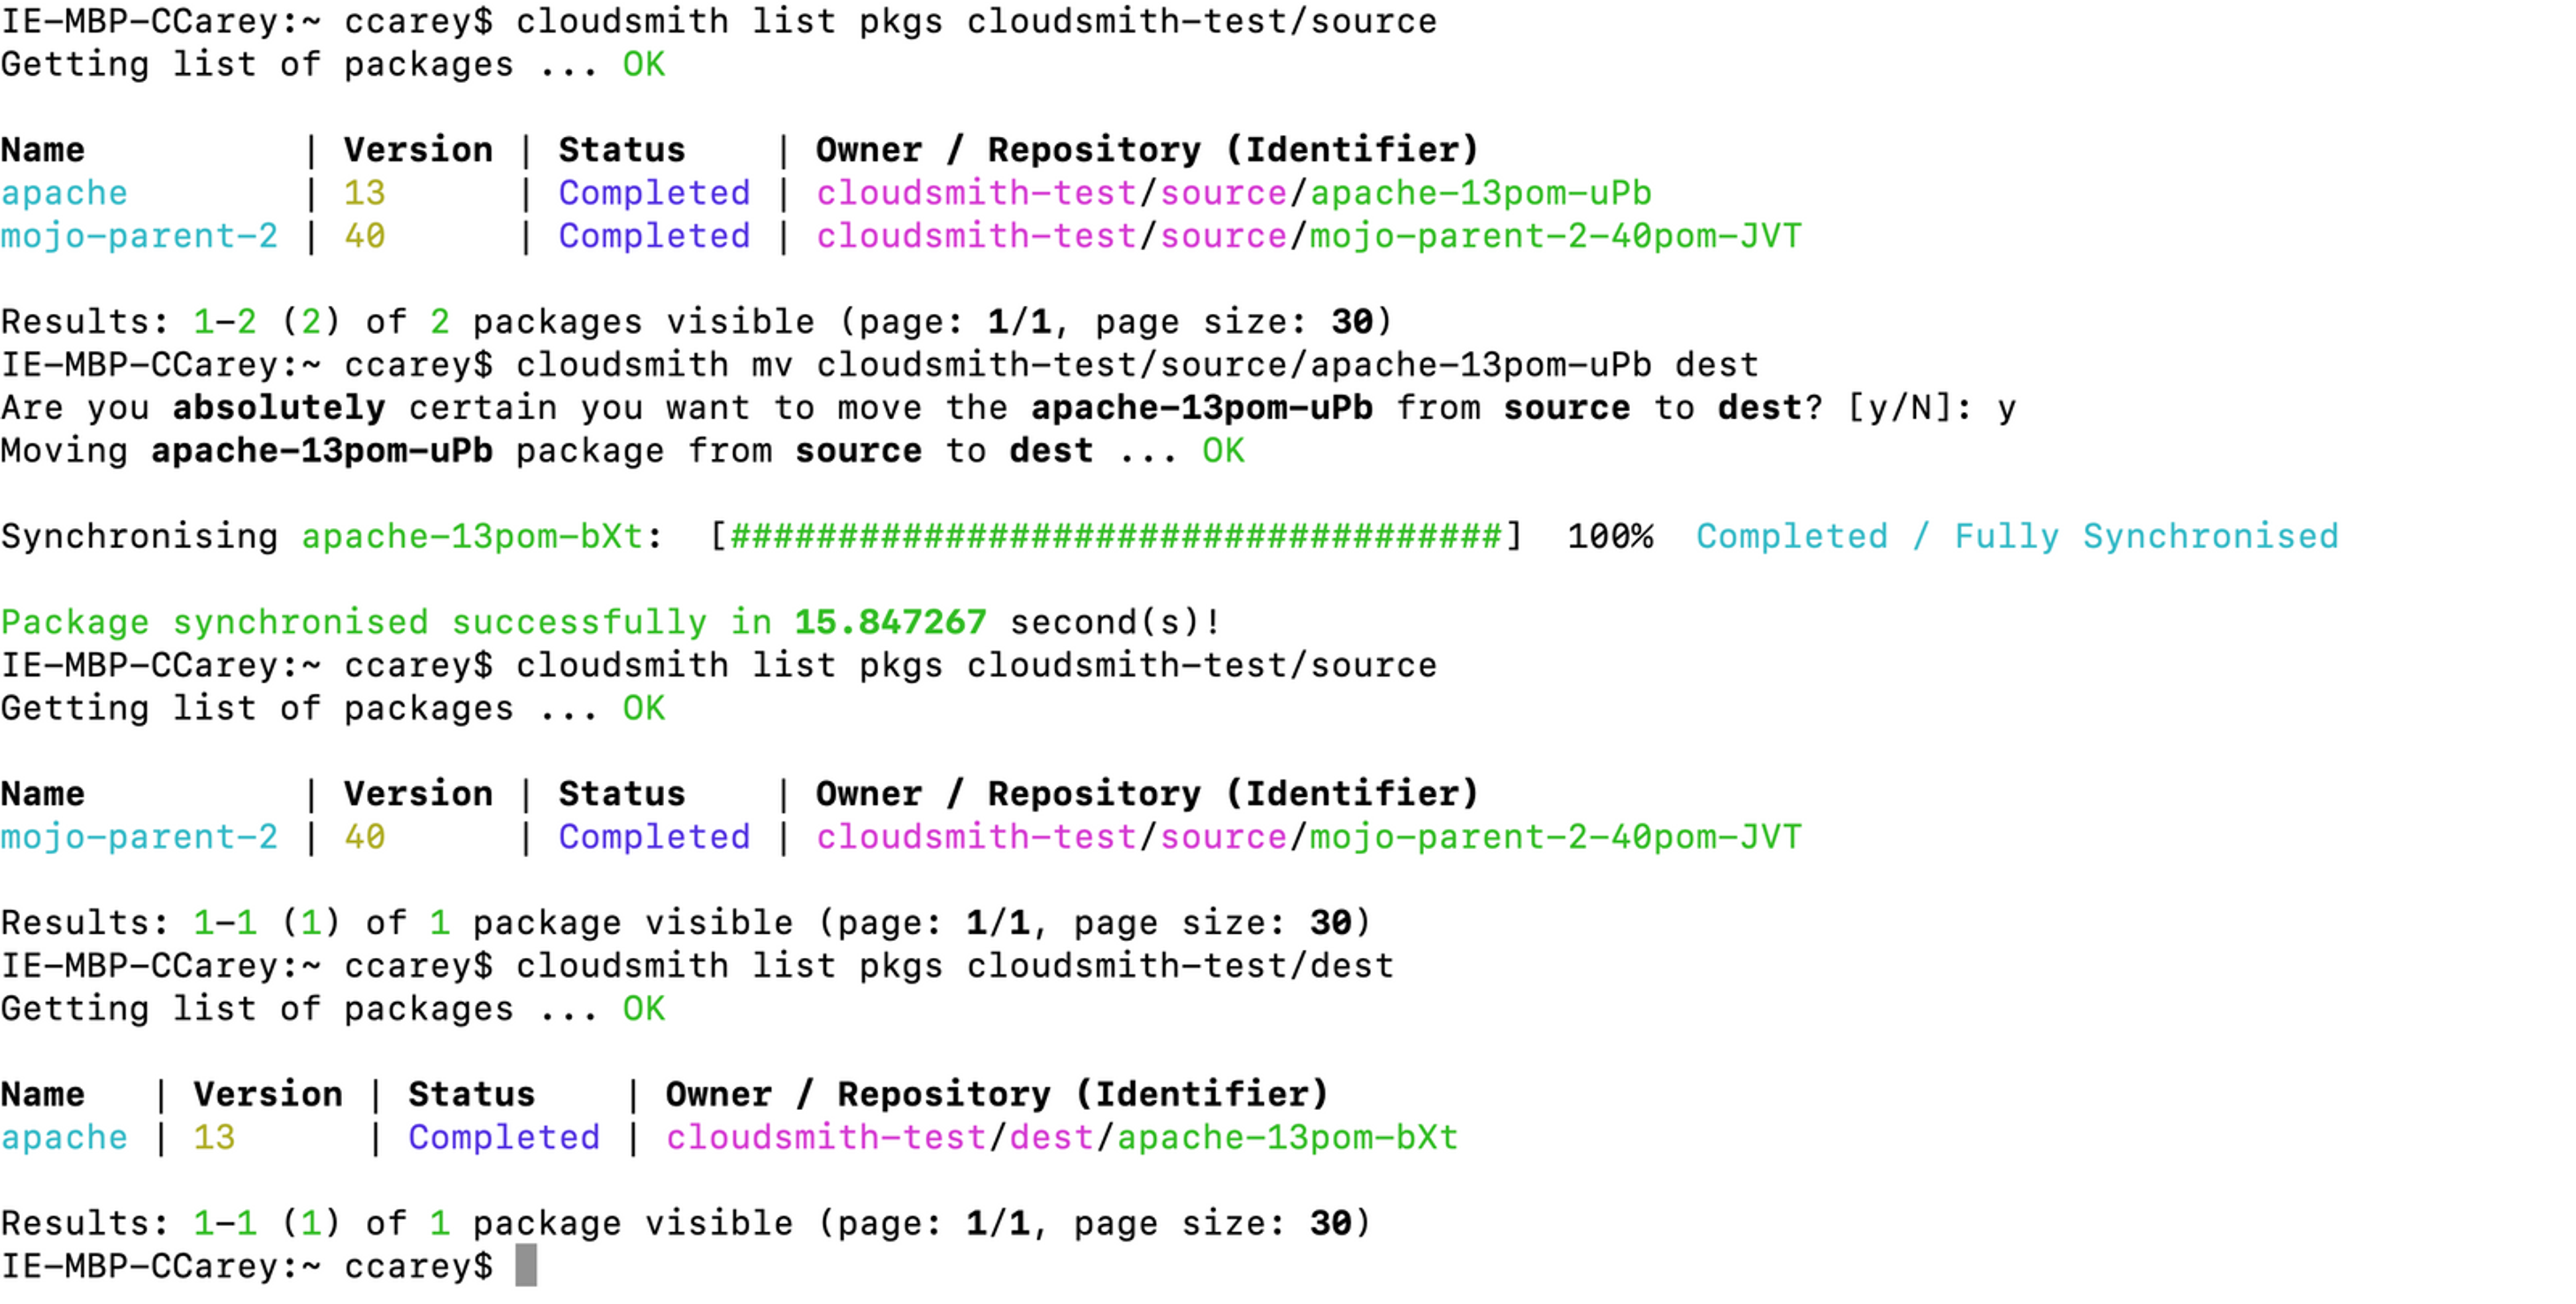
As you can see, the apache-13pom-bXt package was moved (or "promoted") from the source repository to the destination repository. Copying packages works the same, except it duplicates the package rather than moving it from the source to the destination.
In addition to moving and copying packages, you can also resync packages via the CLI, whereby the CLI will retry packages that have failed (for whatever reason) up to a configurable amount of attempts.
To see the full list of help for actions, run the following commands:
> cloudsmith mv
> cloudsmith cp
> cloudsmith resync
Complementary features
Package promotion on its own is great, and you can couple it with other features to create workflows and drive actions. Let's talk about tagging, webhooks, multiformat repos, vulnerability scanning, and setting up upstream.
Package Tagging
Cloudsmith’s custom tagging feature allows you to label your packages with tags like "dev", "staging", or "prod" as they move through your pipeline. These tags help in tracking packages across different environments, and enable targeted searches, filtering, and control over what artifacts are accessible. By using custom tags, you can automate package promotions based on tag transitions, such as promoting a "staging" package to "prod" once it passes certain tests). This enhances visibility and governance within your pipeline and simplifies the overall package management process.
Webhooks
Webhooks let apps send automated messages or information to other apps. Webhooks are great for integrating Cloudsmith with other systems in your build pipeline, by sending data or notifications to other tools in your stack and helping to enable automation across your workflows.
Cloudsmith has webhooks for vulnerability scanning. Anytime a scan is completed, Cloudsmith can dispatch a corresponding vulnerability webhook to trigger some action, like creating a Jira ticket.
Upstreams
Cloudsmith's vulnerability scanning is particularly effective when combined with upstreams. Upstream proxying and caching allow you to upload and use the packages you author in-house directly, while Cloudsmith fetches and caches your dependencies from public repositories like Maven Central or NuGet.org.
This enables you to use Cloudsmith as a first-class cache and a central source of truth for packages, to protect you from issues related to use of external services, such as downtime, rate limiting, or non-availability of a previously available package.
Packages fetched from a caching-enabled upstream will be automatically scanned for vulnerabilities for Ultra customers.
Multiformat repos
Multi-format repositories allow you to store artifacts of different formats in the same place. Organize your packages by environment, project, package type, or whatever way you see fit.
Vulnerability Scanning
Package vulnerability scanning is a key step in securing your software delivery pipeline and reducing the risk of releasing insecure software into production.
Cloudsmith automatically scans every supported package format pushed to a Cloudsmith repository or fetched from a caching-enabled upstream.
Cloudsmith's vulnerability scanning feature is available for the following package formats:
- Docker
- Ruby
- Python
- Composer
- Maven
- NuGet
- Golang
- Cargo
- npm
- Conan
- HEX
- Swift
Cloudsmith's Security Scanning page shows a breakdown of the number of packages scanned/not scanned, the age of scans, the pass/fail count overall and the maximum severity of those found.
Potential workflow for package promotion
- Setup your Dev repository with upstreams and your Staging repos with no upstream
- Push your package to Dev repository and tag the package with ‘dev’.
- Set up a webhook for scan results
- Automatically tag the package with ‘staging’ and move the package to the Staging repository when the results return with no vulnerabilities.NOTE: you may want to run more manual tests against this package before promoting it.
Let’s assume you have installed the Cloudsmith CLI for the examples below. The CLI interfaces with Cloudsmith's API and allows users, machines and other services to access and integrate smoothly with Cloudsmith without requiring explicit plugins or tools.
Setup your Dev repository with upstreams and your Staging repository with no upstreams
Create 2 repositories Dev and Staging by following the instructions here.
Set up an upstream for the Dev repo by following the instructions here.
Push a package to Dev
A vulnerability scan is automatically triggered for supported packages every time they are pushed into a Cloudsmith repository. If you set up an upstream, your 3rd party dependencies are also scanned for vulnerabilities.
Cloudsmith supports over 30 different types of packages. Uploading a package/binary/image to a Cloudsmith repository is simple:
- Upload via the package-specific native CLI / tools e.g. using Maven's mvn deploy, Node's npm publish, .NET's nuget push or Ruby's gem push.
- Upload via the API using tools/integrations (such as the official Cloudsmith CLI).
- Upload directly via the website.
To upload a package via the Cloudsmith CLI, use the cloudsmith push command:
cloudsmith push <format> OWNER/REPOSITORY <package_file>Set up a webhook for scan results
Setting up webhooks so Cloudsmith can send automated messages to alert another system when a package had been scanned is great for setting up vulnerability workflows.
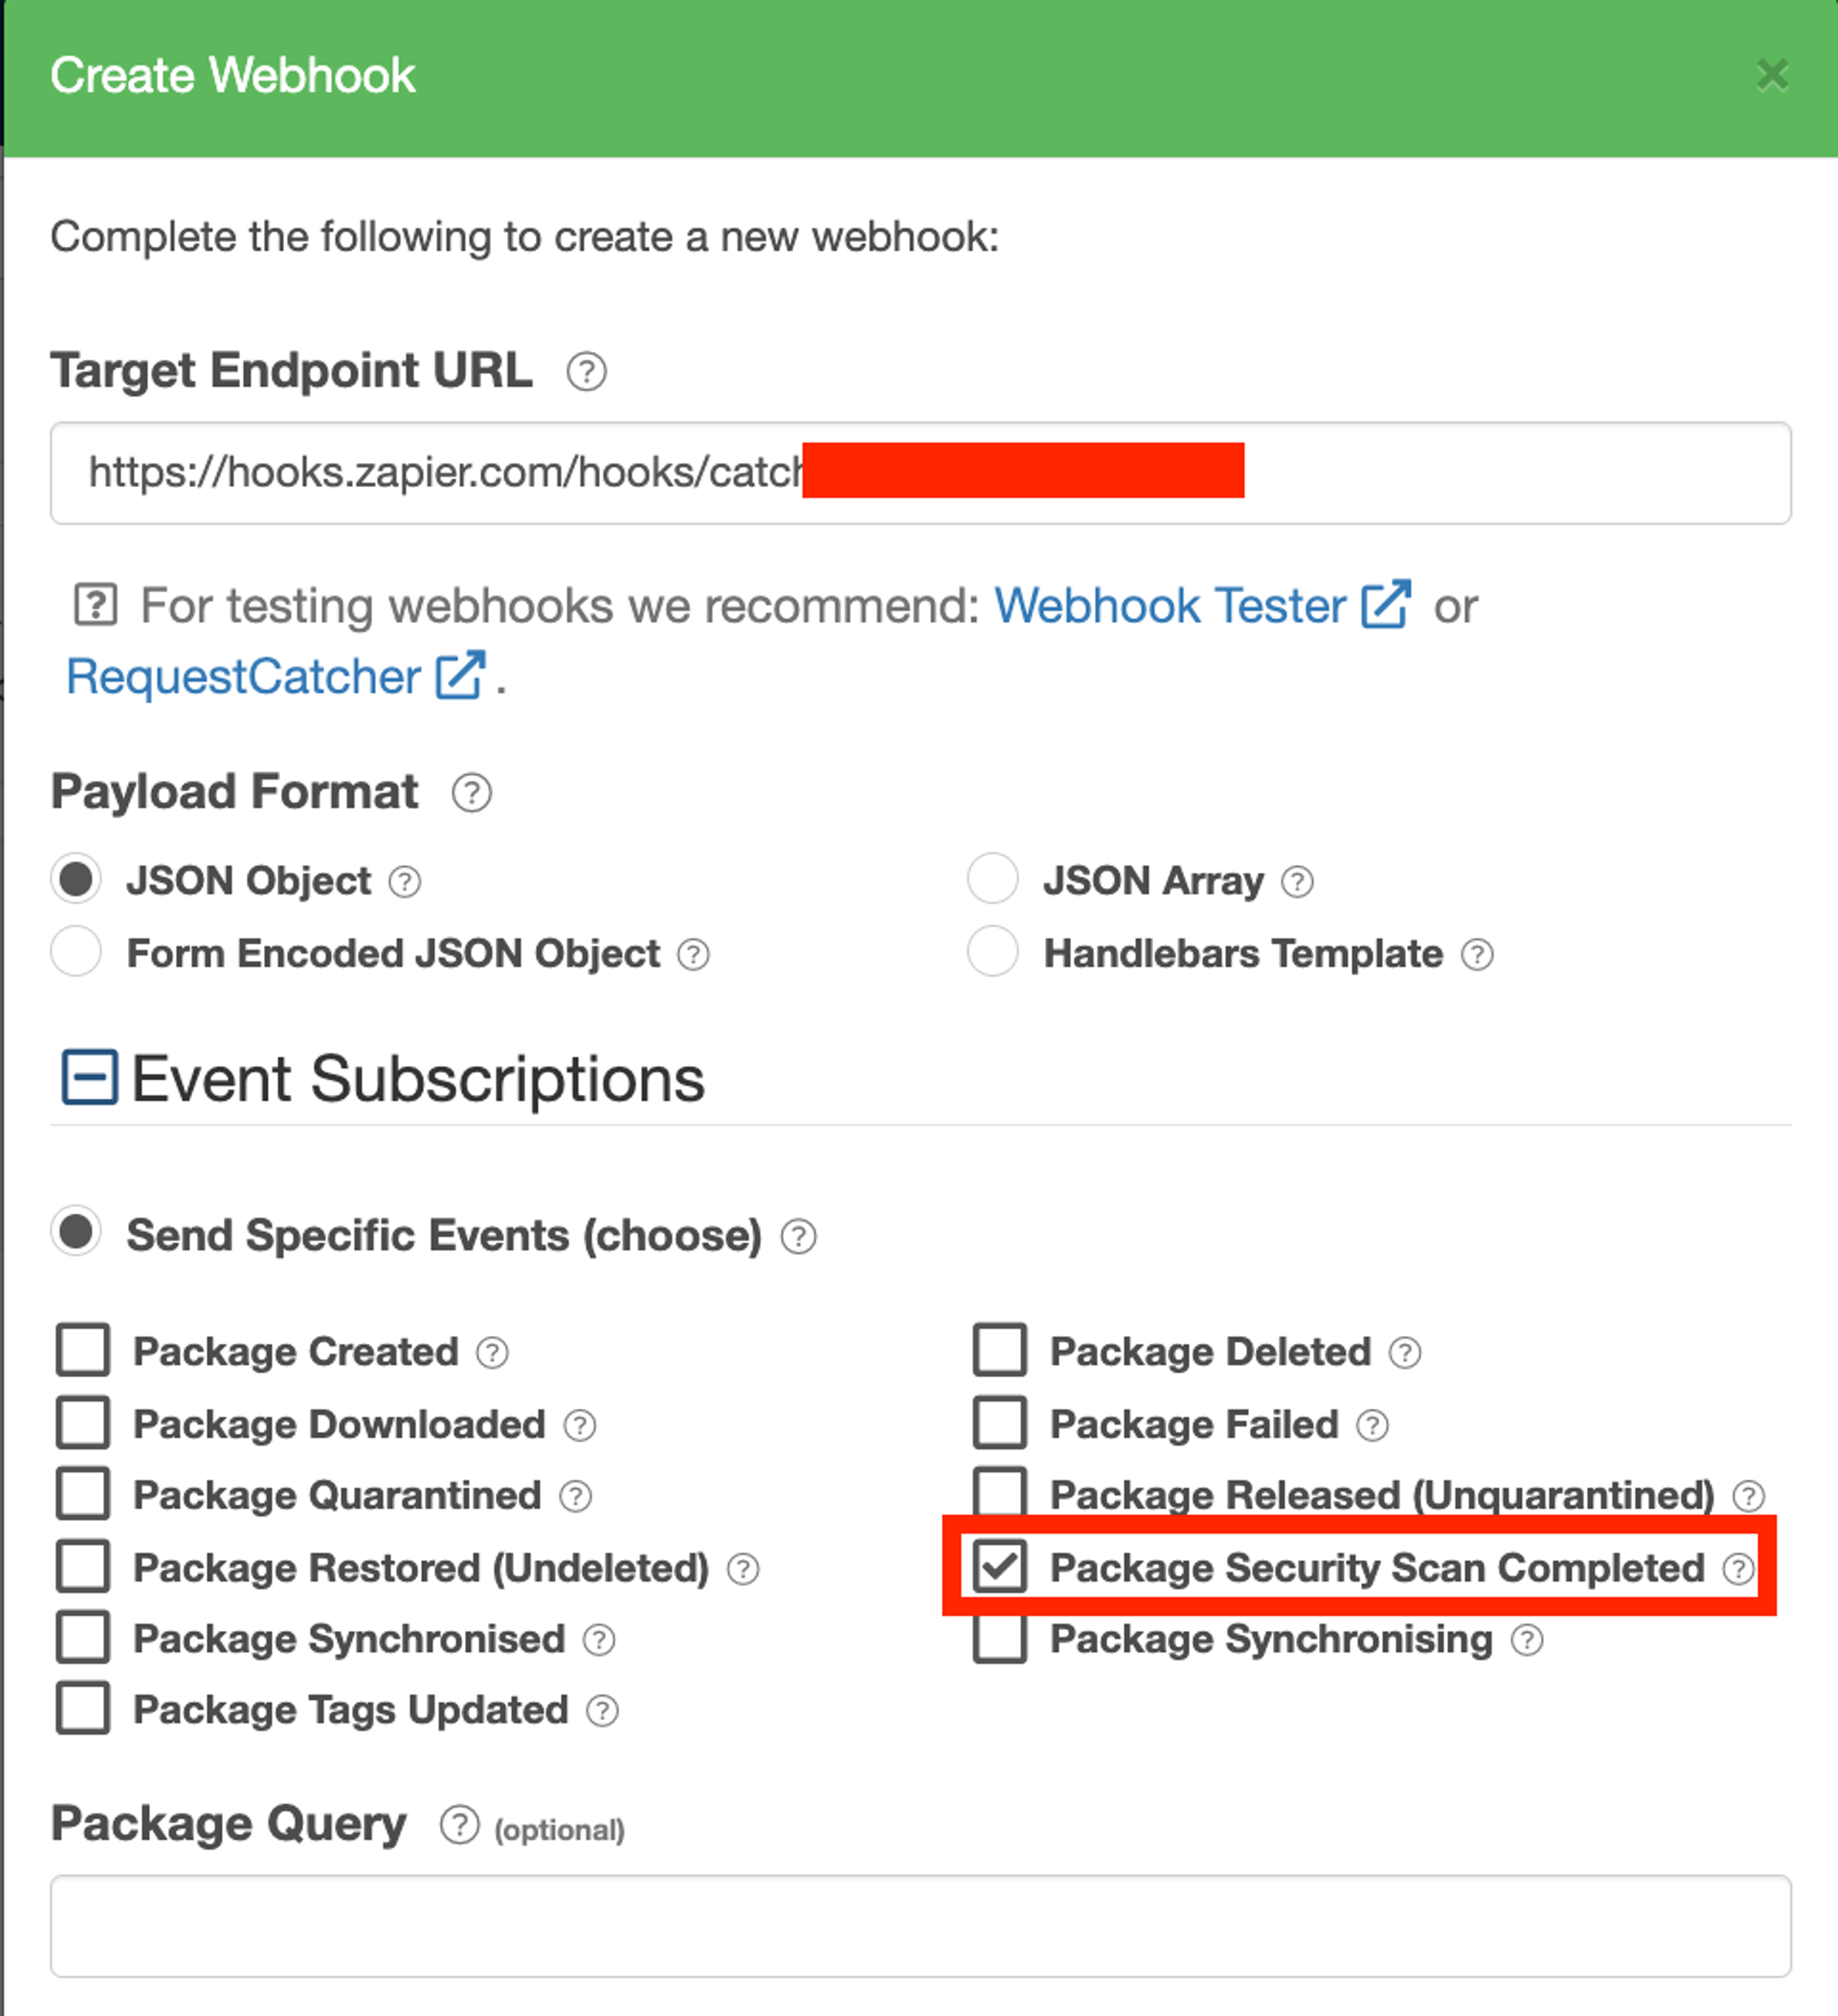
Set up a webhook for vulnerability scanning by clicking Webhooks in your repository and then create a new webhook. Then:
- Select the Create Webhook button.
- Populate the Target Endpoint URL with the tool you want to receive your webhook like Jenkins, Zapier, CircleCI, Github Actions or BuildKite.
- Selecting the Package Security Scan Completed checkbox
You can test out the Webhook by selecting to Ping (test) this webhook.
Tag and Promote a package
The webhook is triggered when the scan is finished and will have a payload in the HTTP req with information about the package and any vulnerabilities, including:
"slug_perm":"IB6FYhIvaoAy",
"max_severity":"Medium",
"num_vulnerabilities":140,"
"vulnerability_scan_results_url":"https://api-prd.cloudsmith.io/v1/vulnerabilities/demo/examples-repo/IB6FYhIvaoAy/"
This information can drive actions such as tagging and promoting a package based on the maximum severity reported.
To tag a package using the Cloudsmith CLI, use the command cloudsmith tag as follows:
cloudsmith tag add OWNER/REPOSITORY/PACKAGE TAG1, TAG2
To promote a package use the Cloudsmith CLI command cloudsmith cp or mv as follows:
cloudsmith cp OWNER/REPOSITORY/PACKAGE
or
cloudsmith mv OWNER/REPOSITORY/PACKAGE
For example, using the data from the snippet above where IB6FYhIvaoAy is the package identifier or the package slug:
cloudsmith cp demo/examples-repo/IB6FYhIvaoAy
Enhance your Workflows with Policy Management
To further secure and streamline your package promotion workflows, Cloudsmith’s Policy Management features can be used to automate and enforce critical security measures. With License Policies, you can automatically block or quarantine packages that violate license rules, while Vulnerability Policies scan for potential risks, quarantining packages based on severity. Package Deny Policies reject unwanted or risky packages, and Authentication Policies enforce API-key rotation to ensure secure access.
These policies make your workflows more secure, compliant, and automated—minimizing manual intervention and reducing risk across your software supply chain. To explore these features in more detail, check out our blog on Enhanced Security with Policy Management.
Enterprise Policy Management Coming Soon
Looking ahead, Cloudsmith’s Enterprise Policy Manager will further enhance promotion workflows with advanced controls. It will allow policies to be applied at any decision point, ensuring real-time enforcement of security and compliance rules like “should we allow this action?”
Key features include:
- Flexible Policies: Create custom policies tailored to your specific needs, from access control to package promotion.
- OPA Integration: Manage and trace policies at scale for better compliance.
- Rich Metadata: Integrate data like Cloudsmith Navigator and security scanners for more informed decisions.
- Pre-built Templates: Speed up implementation with best-practice policy templates.
- Seamless Integrations: Leverage your existing security tools within Cloudsmith.
- Policy as Code: Automate and store policies as code for easy observability and scalability.
Conclusion
Package promotion used in conjunction with Cloudsmith's features like multiformat repositories, webhooks, vulnerability scanning, policy manager and upstreams will set you up with a very useful workflow that can isolate and protect your production repositories from upstreams and vulnerabilities.
More articles


Why cloud migrations are the best time to re-evaluate your artifact management

AI artifacts: The new software supply chain blind spot

Access control & permissions for multi-format repositories

The true cost of legacy artifact management

The Hybrid Repository Structure: Balancing Control and Flexibility
By submitting this form, you agree to our privacy policy
