Integrating Dependabot with Cloudsmith Using OIDC

OpenID Connect (OIDC) provides ephemeral tokens, reducing the risk of long-lived credentials being exposed. For many organizations, artifact management tokens are among the most widely used credentials, making them a significant target for security breaches.
Shifting to OIDC is an excellent way to strengthen security posture, offering substantial benefits with minimal implementation effort. While direct Dependabot integration with OIDC in GitHub Actions isn’t available, API-based token rotation offers a reliable workaround.
This guide will walk you through configuring GitHub Dependabot to authenticate with Cloudsmith using OIDC. It includes steps for setting up a Cloudsmith service account, configuring OIDC in Cloudsmith, setting up GitHub permissions, and creating a GitHub Actions workflow to dynamically update the Dependabot API key.
Step 1: Create a Service Account in Cloudsmith
- Go to Cloudsmith and log in to your organization.
- Navigate to Services:
- In your Cloudsmith organization, go to Settings > Services.
- Click on Create Service.
- Configure Service Account:
- Enter a name (e.g., Dependabot Service Account) and description.
- Select any teams that the service account should be associated with for broader permissions.
- Save your new service account.
For more details, see Cloudsmith Service Account documentation.
Step 2: Configure OIDC Authentication for GitHub Actions in Cloudsmith
- Set Up OIDC Provider in Cloudsmith:
- Go to Settings > OpenID Connect in Cloudsmith.
- Click on Create Provider.
- Provider Name: Enter a descriptive name (e.g., GitHub Actions).
- Provider URL: Enter https://token.actions.githubusercontent.com.
- Set Required OIDC Claims:
- Add repository_owner as the required claim for GitHub OIDC tokens to restrict access to your specific GitHub organization.
- Set Claim Value to your GitHub organization name.
- Link Service Account:
- In the same form, under Service Accounts, select the service account created in Step 1 (Dependabot Service Account).
- Save the OIDC configuration.
For reference, see OIDC setup with GitHub Actions in Cloudsmith.
Step 3: Set Up Access Controls in Cloudsmith
- Grant Access to Cloudsmith Repository:
- Go to the Repository Settings > Access Controls for the repository where you want Dependabot to manage dependencies.
- Under Privileges for Specific Services, add the Dependabot Service Account.
- Set the privilege level to Read or Write as required by your dependency updates.
- Save the settings.
For further instructions, see Cloudsmith Access Controls documentation.
Step 4: Add a Fine-Grained Personal Access Token (PAT) in GitHub for Dependabot
- Go to GitHub and open Settings > Developer settings > Personal access tokens > Fine-grained tokens.
- Generate a new Fine-Grained PAT with the following permissions:
- Repository permissions:
- Dependabot secrets: Read and write.
- Grant Access to the specific repository where you want to use Dependabot.
- Repository permissions:
- Save and copy the PAT.
- Add PAT to GitHub Secrets:
- Go to the Settings > Secrets and variables > Actions in your repository.
- Add a new secret with the name FINE_GRAINED_PAT and paste the PAT as the value.
Step 5: Create DEP_CLOUDSMITH_API_KEY Secret for Dependabot
- Go to Your GitHub Repository Settings:
- Navigate to Settings > Secrets and variables > Dependabot.
- Create a New Dependabot Secret:
- Click on New repository secret.
- Set Name to DEP_CLOUDSMITH_API_KEY.
- For the Value, enter a placeholder value (e.g., INITIAL_VALUE or a temporary token from Cloudsmith).
- Click Add secret.
- Why This Initial Secret is Needed:
- This sets up DEP_CLOUDSMITH_API_KEY as a Dependabot-compatible secret so that the GitHub Action can later overwrite it with an ephemeral OIDC token each time it runs.
- The initial value doesn’t need to be valid long-term, as it will be regularly replaced by the OIDC-generated token.
After this initial setup, the GitHub Actions workflow you configured will take over, updating DEP_CLOUDSMITH_API_KEY with each run.
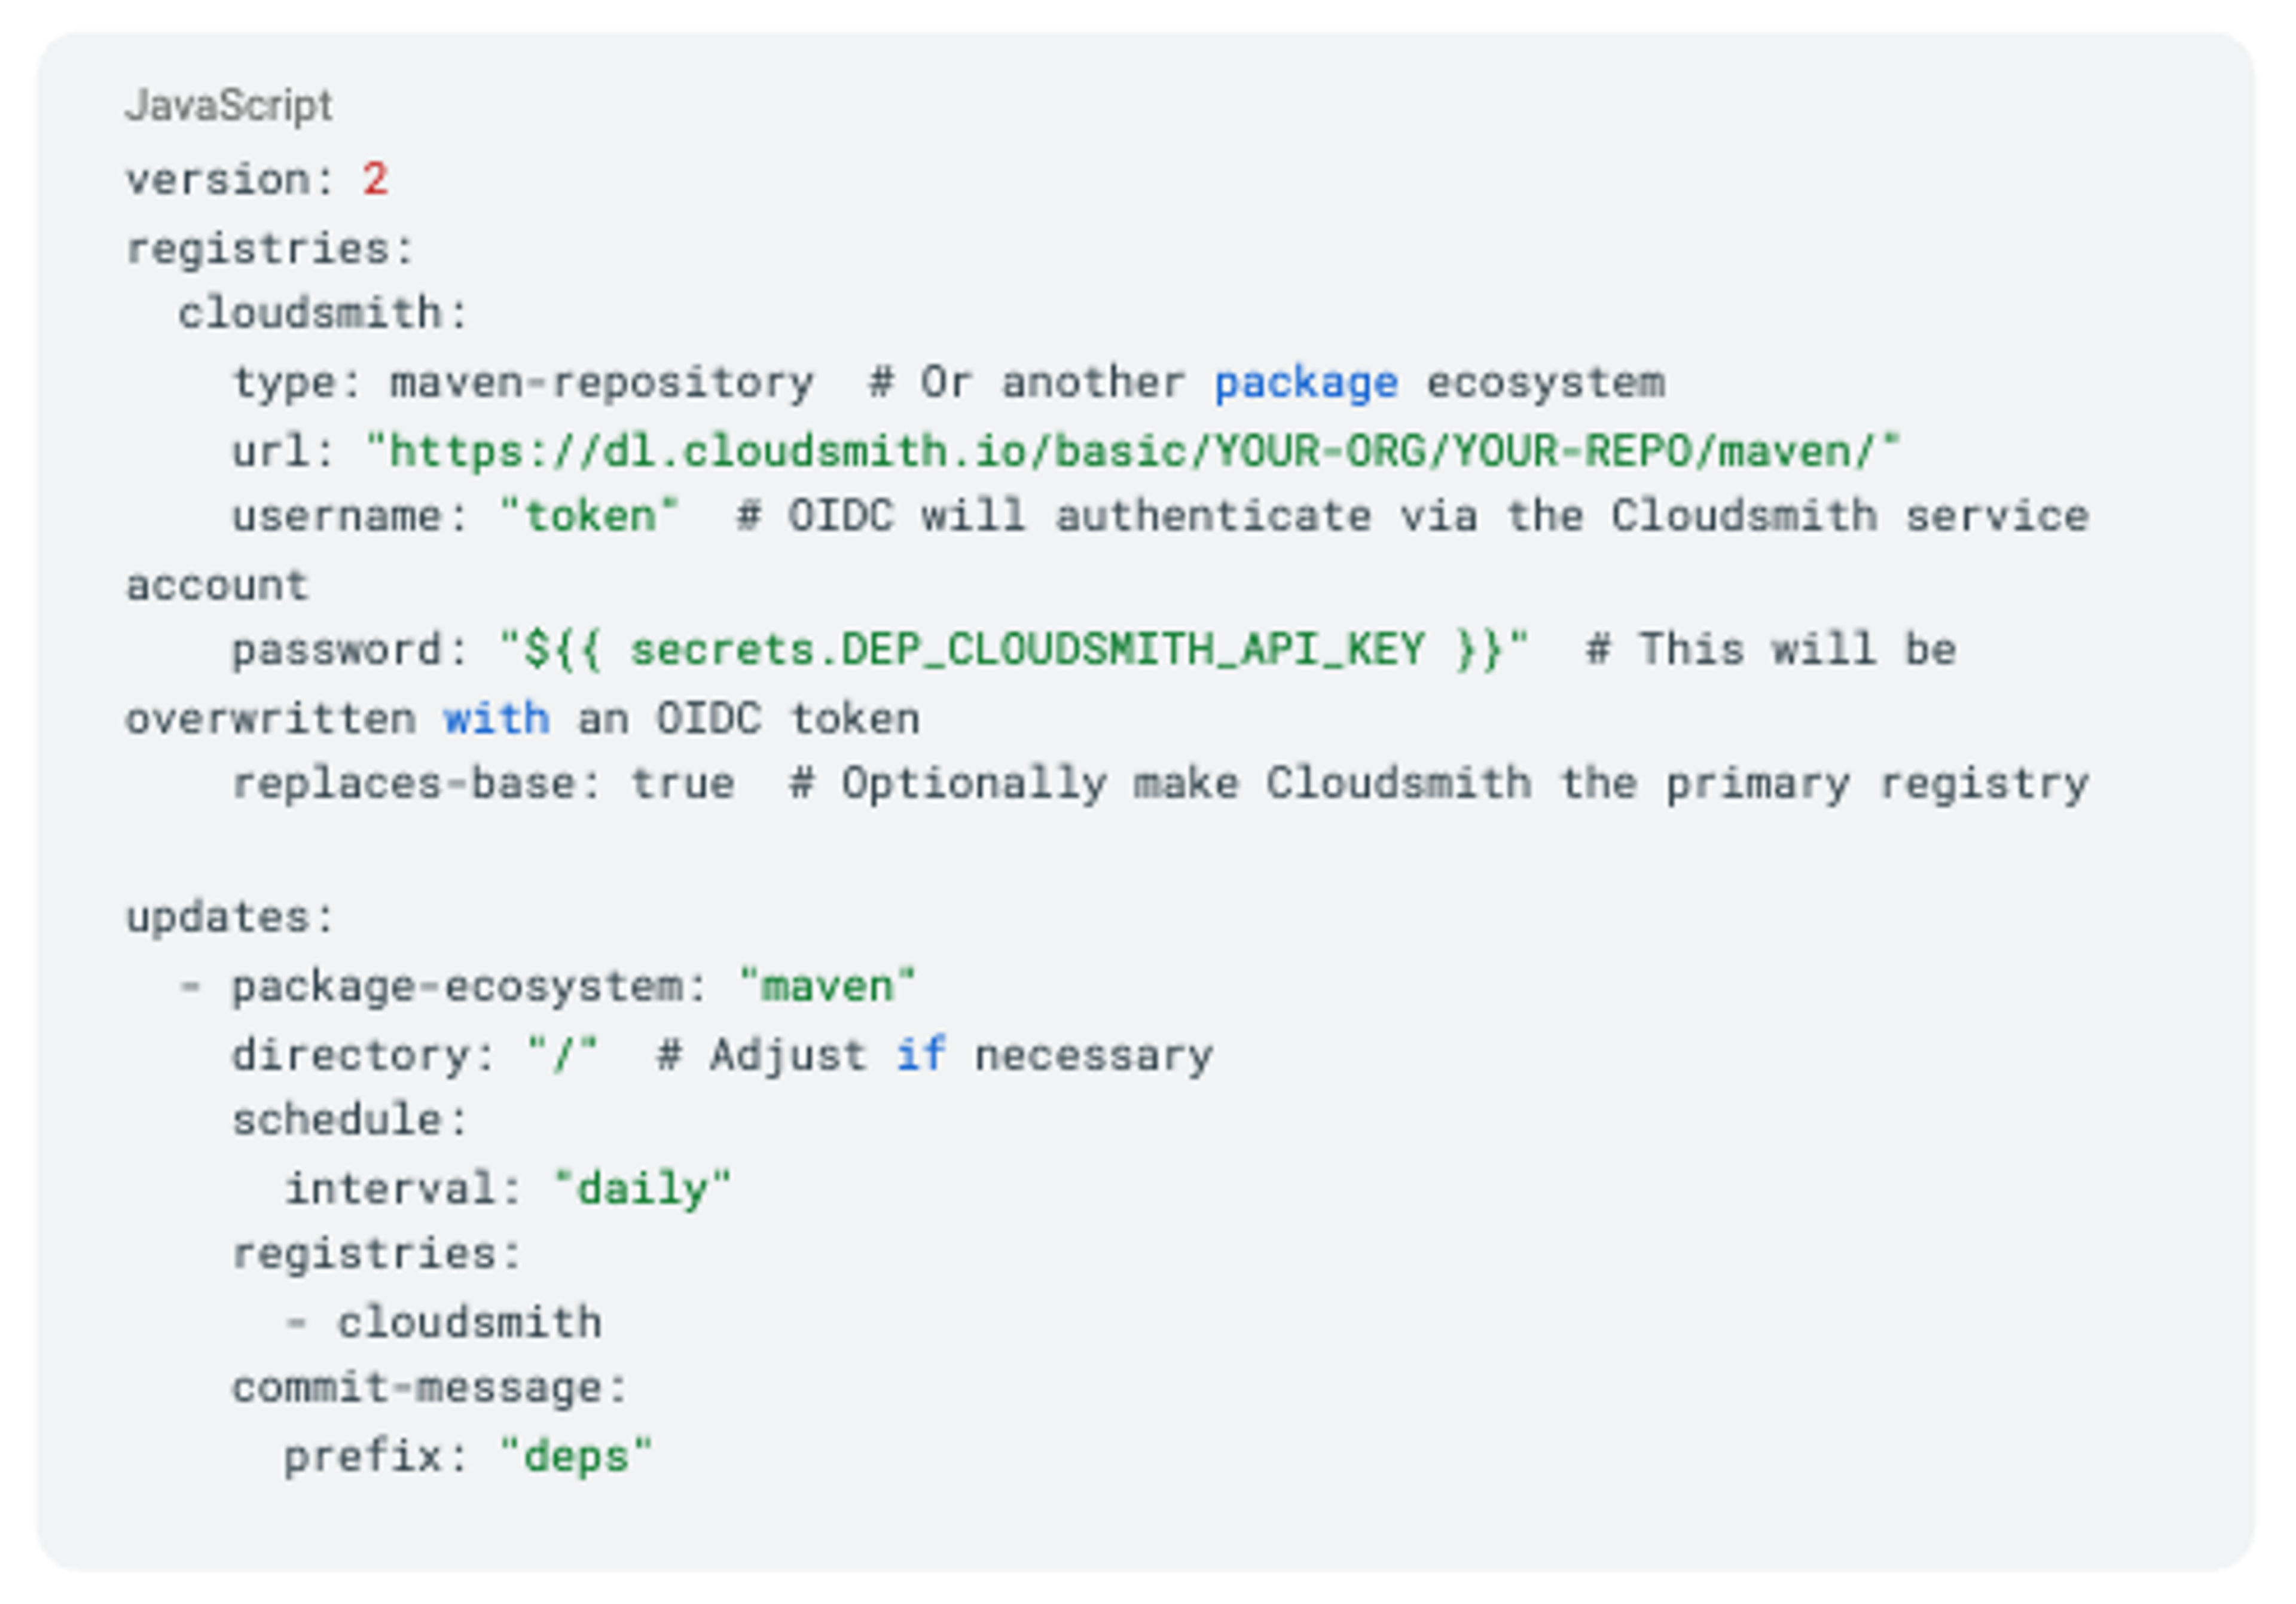
Step 6: Configure the dependabot.yml File
In your GitHub repository, create or update .github/dependabot.yml. The example below uses a Maven repository configuration, but this works with other package ecosystems, including npm, pip, and more (see the Dependabot configuration guide for details).:

Replace YOUR-ORG and YOUR-REPO with your actual Cloudsmith organization and repository details. This configuration will enable Dependabot to connect to Cloudsmith for dependency updates.
Step 7: Set Up a GitHub Action Workflow to Overwrite the Dependabot API Key with an Ephemeral OIDC Token
This workflow will authenticate with Cloudsmith via OIDC, generate a short-lived token, and overwrite the DEP_CLOUDSMITH_API_KEY used by Dependabot. Given that Cloudsmith’s OIDC tokens expire every 2 hours, this example schedules token rotation every 11 hours to align with Dependabot’s run schedule. If your setup requires more frequent rotations or encounters token expiration issues, adjust the schedule accordingly.
- Create a New Workflow File:
- In your repository, create a file at .github/workflows/update-cloudsmith-key.yml.
- Configure Workflow:

- Replace Variables:
- Replace YOUR-ORG with your Cloudsmith organization slug.
- Replace YOUR-SERVICE-SLUG with the slug of the Cloudsmith service account created earlier.
- Save and Commit the file.
This workflow uses OIDC to obtain a JWT from Cloudsmith, overwriting the DEP_CLOUDSMITH_API_KEY Dependabot secret with an ephemeral, short-lived token.
Testing the Setup
- Manually Trigger the Workflow:
- Go to Actions in your GitHub repository and manually run the workflow.
- Check Dependabot:
- Go to Insights > Dependency Graph > Dependabot and select Check for updates.
- Verify Dependabot Pull Requests:
- Ensure Dependabot is fetching updates from Cloudsmith and creating pull requests as expected.
This setup allows Dependabot to use a short-lived Cloudsmith OIDC token, enhancing security by overwriting the DEP_CLOUDSMITH_API_KEY secret with each token request.
Next: Learn how to leverage Cloudsmith with Dependabot to streamline your dependency management here.
More articles


Kubernetes 1.35 – What you need to know

Python 3.14 – What you need to know

Migrating from Docker Content Trust to Sigstore

Kubernetes 1.34 – What you need to know

Adding AI to applications using the Model Context Protocol
By submitting this form, you agree to our privacy policy
