Unlocking policy-as-code automation with Cloudsmith EPM

When talking about DevOps and software delivery pipelines, security, compliance, and governance should all be native to the development workflow. Yet traditional approaches to software supply chain security often feel bolted-on. Proprietary black boxes are hard to integrate - and harder still to understand or extend. Instead of adapting to your workflows, you’re expected to adapt to theirs, with little room for customisation or clarity about what they’re actually doing under the hood.
That’s where Cloudsmith’s Enterprise Policy Management (EPM) differs from other legacy approaches. This is a powerful, flexible, and developer-friendly way to implement policy-as-code using the Open Policy Agent (OPA) and its associated Rego, natively within your artifact management pipeline.
From proprietary to programmable
Legacy artifact management systems typically offer pre-baked security gates that require manual reviews, or offer minimal configurability. While these should solve some business outcomes, they often don’t scope well to your specific business logic. Cloudsmith gives teams full access to define policies using Rego, a standard open-source policy language used in many enterprise solutions.
This familiar policy language is ideal for teams who are automating supply chain security controls. Cloudsmith’s EPM enables fine-grained, conditional control over package handling during security scanning. Additionally, Cloudsmith’s policy implementation integrates with automation tools via Cloudsmith's robust REST API. With EPM, you can go beyond one-size-fits-all policies and encode the exact rules that matter to your organization, whether it's license restrictions, CVSS thresholds, naming conventions, or internal workflows.
Policy-as-code is practical and powerful
Cloudsmith policies are evaluated during package synchronization, after a security scan completes. This gives teams a reliable hook to enforce quality, security, and compliance gates before artifacts move deeper into production pipelines. Here’s what makes it practical:
Rego-based rules:
All policies are written in Rego and must follow a specific schema. As long as Cloudsmith supports the specific built-in functions required in the policy, it should be valid. Rego is incredibly flexible.
As seen in the example below, you can use RegEx within OPA Rego to match specific package filenames that contain a semantic versioning for the file name, or use RegEx to scope the unique business context that matters to you.
package cloudsmith
default match := false  # Assume the package is fine unless we find a problem
match if count(reason) > 0  # Match the policy only if we generate at least one reason

reason contains msg if {
  pkg := input.v0["package"]

  # Focus only on files that start with 'h11-'
  startswith(pkg.filename, "h11-")

  # Ensure they match semantic versioning pattern
  not regex.match("^h11-[0-9]+\\.[0-9]+\\.[0-9]+\\.(tar\\.gz|whl)$", pkg.filename)

  # Give a descriptive reason if not
  msg := sprintf("Filename '%s' does not match required SemVer pattern", [pkg.filename])
}
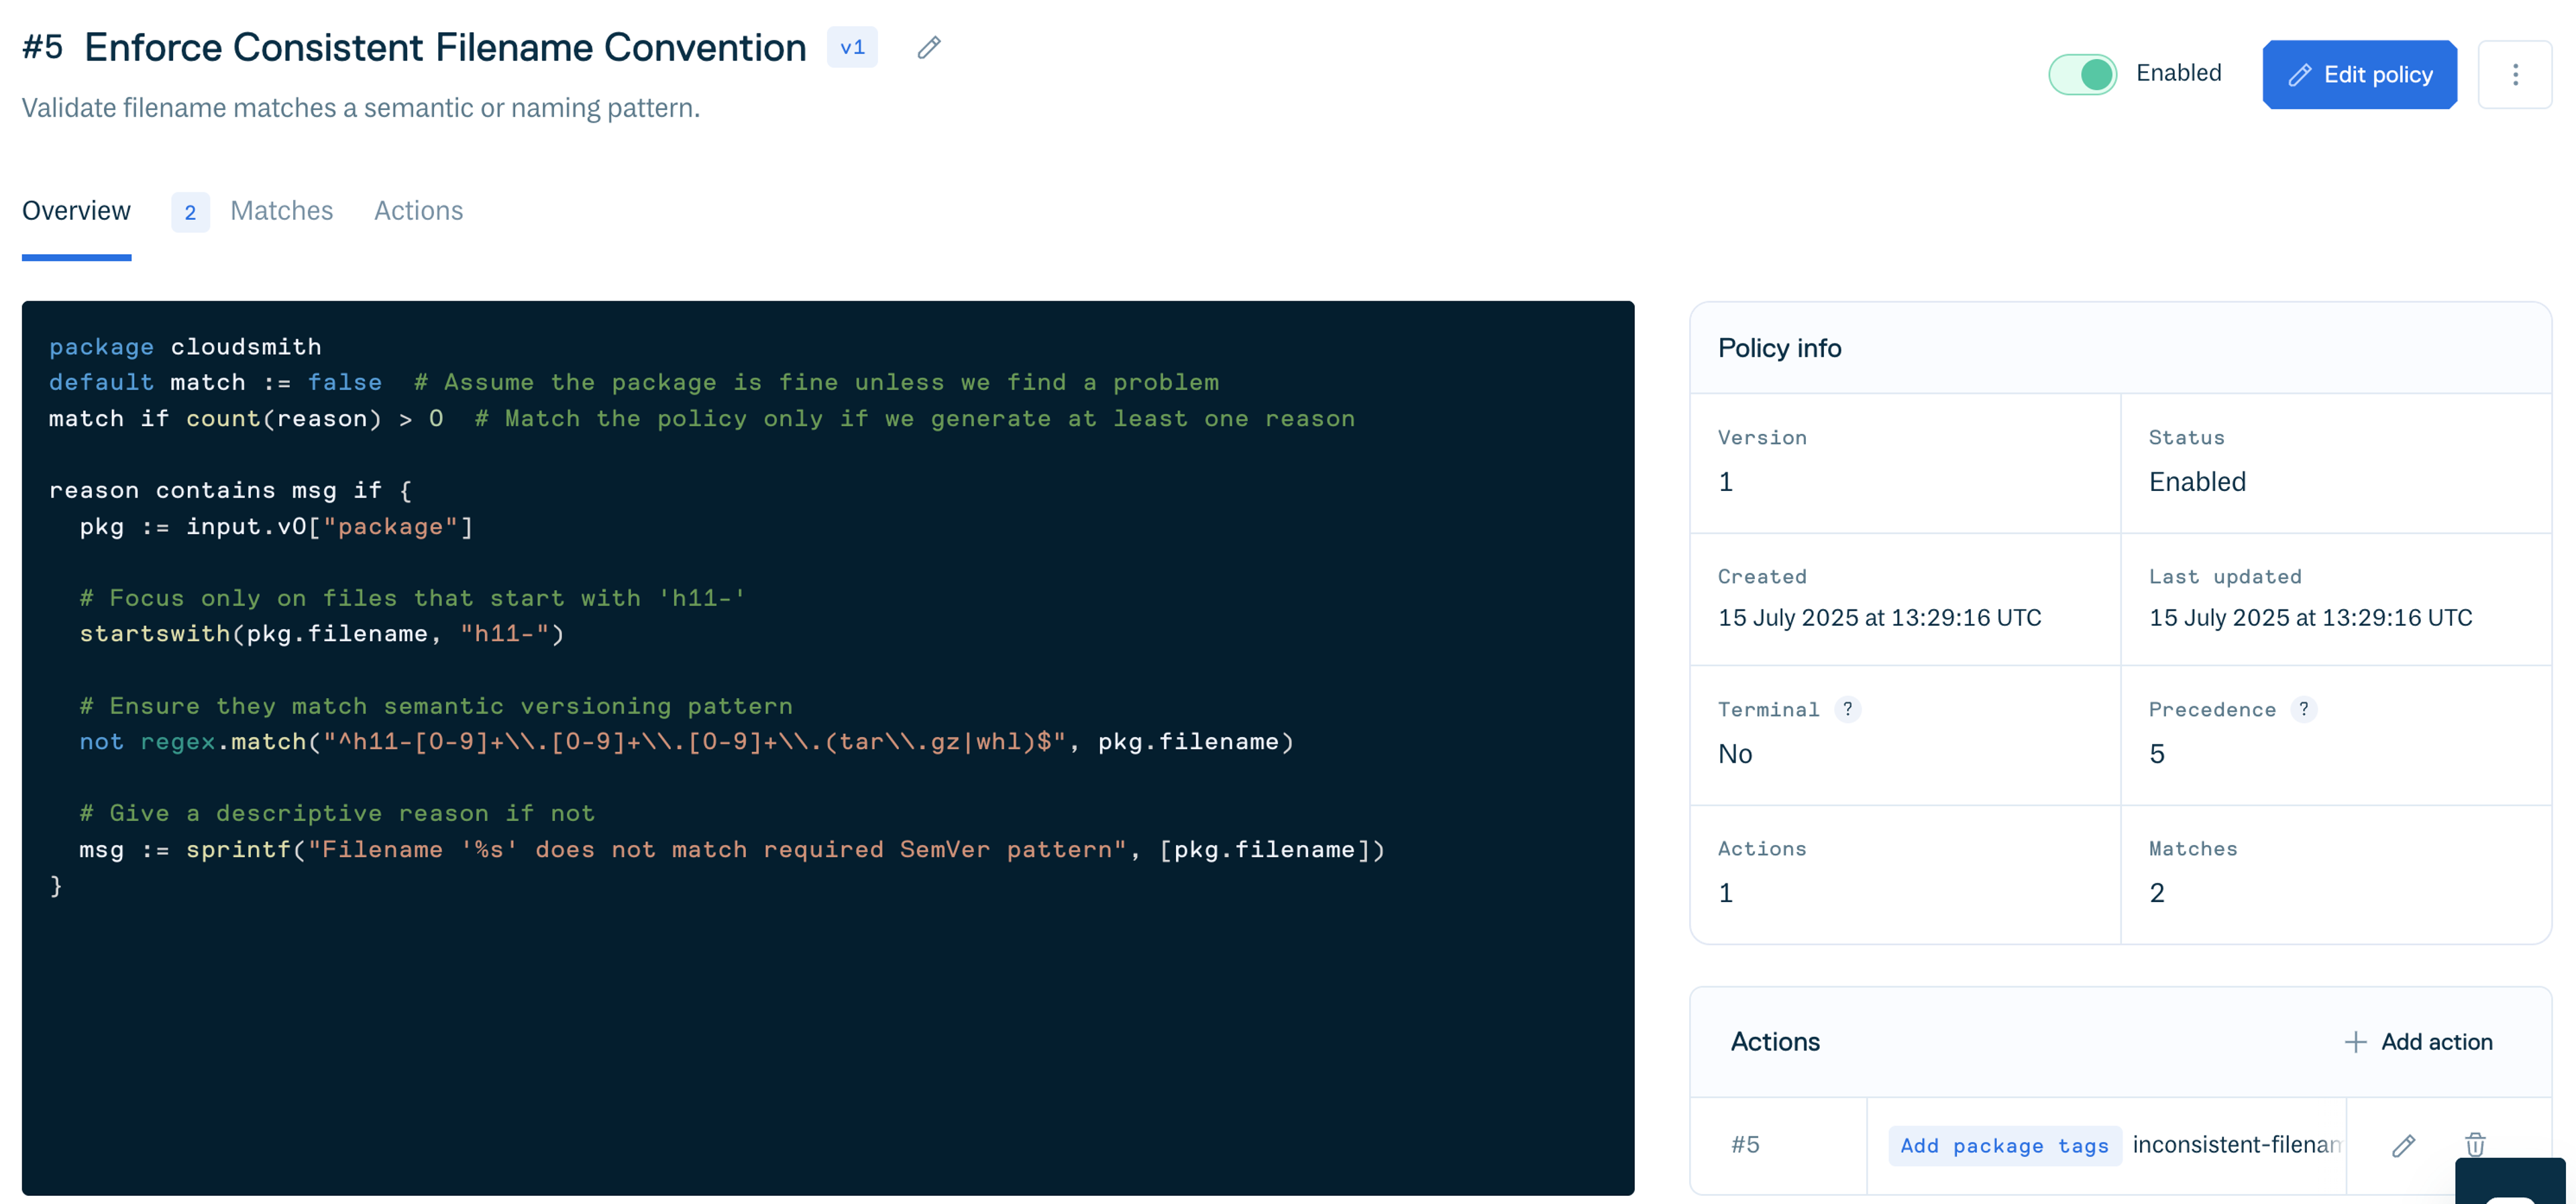
This Rego policy is designed to enforce a naming convention for packages in a Cloudsmith repository. Specifically, it ensures that package filenames starting with h11- follow semantic versioning (SemVer) and end in either .tar.gz or .whl.
Human-Readable Breakdown:
The policy implements filename prefix check to target only packages where the filename starts with h11-. The regex match for SemVer, scans those h11- files, and it enforces a filename pattern where <MAJOR>, <MINOR>, and <PATCH> are all numeric.
h11-<MAJOR>.<MINOR>.<PATCH>.tar.gz
h11-<MAJOR>.<MINOR>.<PATCH>.whl
Finally, policy introduces mismatch handling, where the filename does not conform to this SemVer pattern with an approved extension, the policy matches and produces a human-readable message explaining why.
Terminal logic:
Policies are considered terminal by default. When a match occurs, execution stops and the associated actions trigger. This is the policy evaluation flow. Policies are evaluated in order of their precedence (lowest number = higher priority). When a policy’s Rego rule evaluates to match = true, it’s considered a match. By default, Cloudsmith stops evaluating any further policies after this match. The actions associated with that matching policy (like tagging, quarantining, or changing state) are immediately triggered.
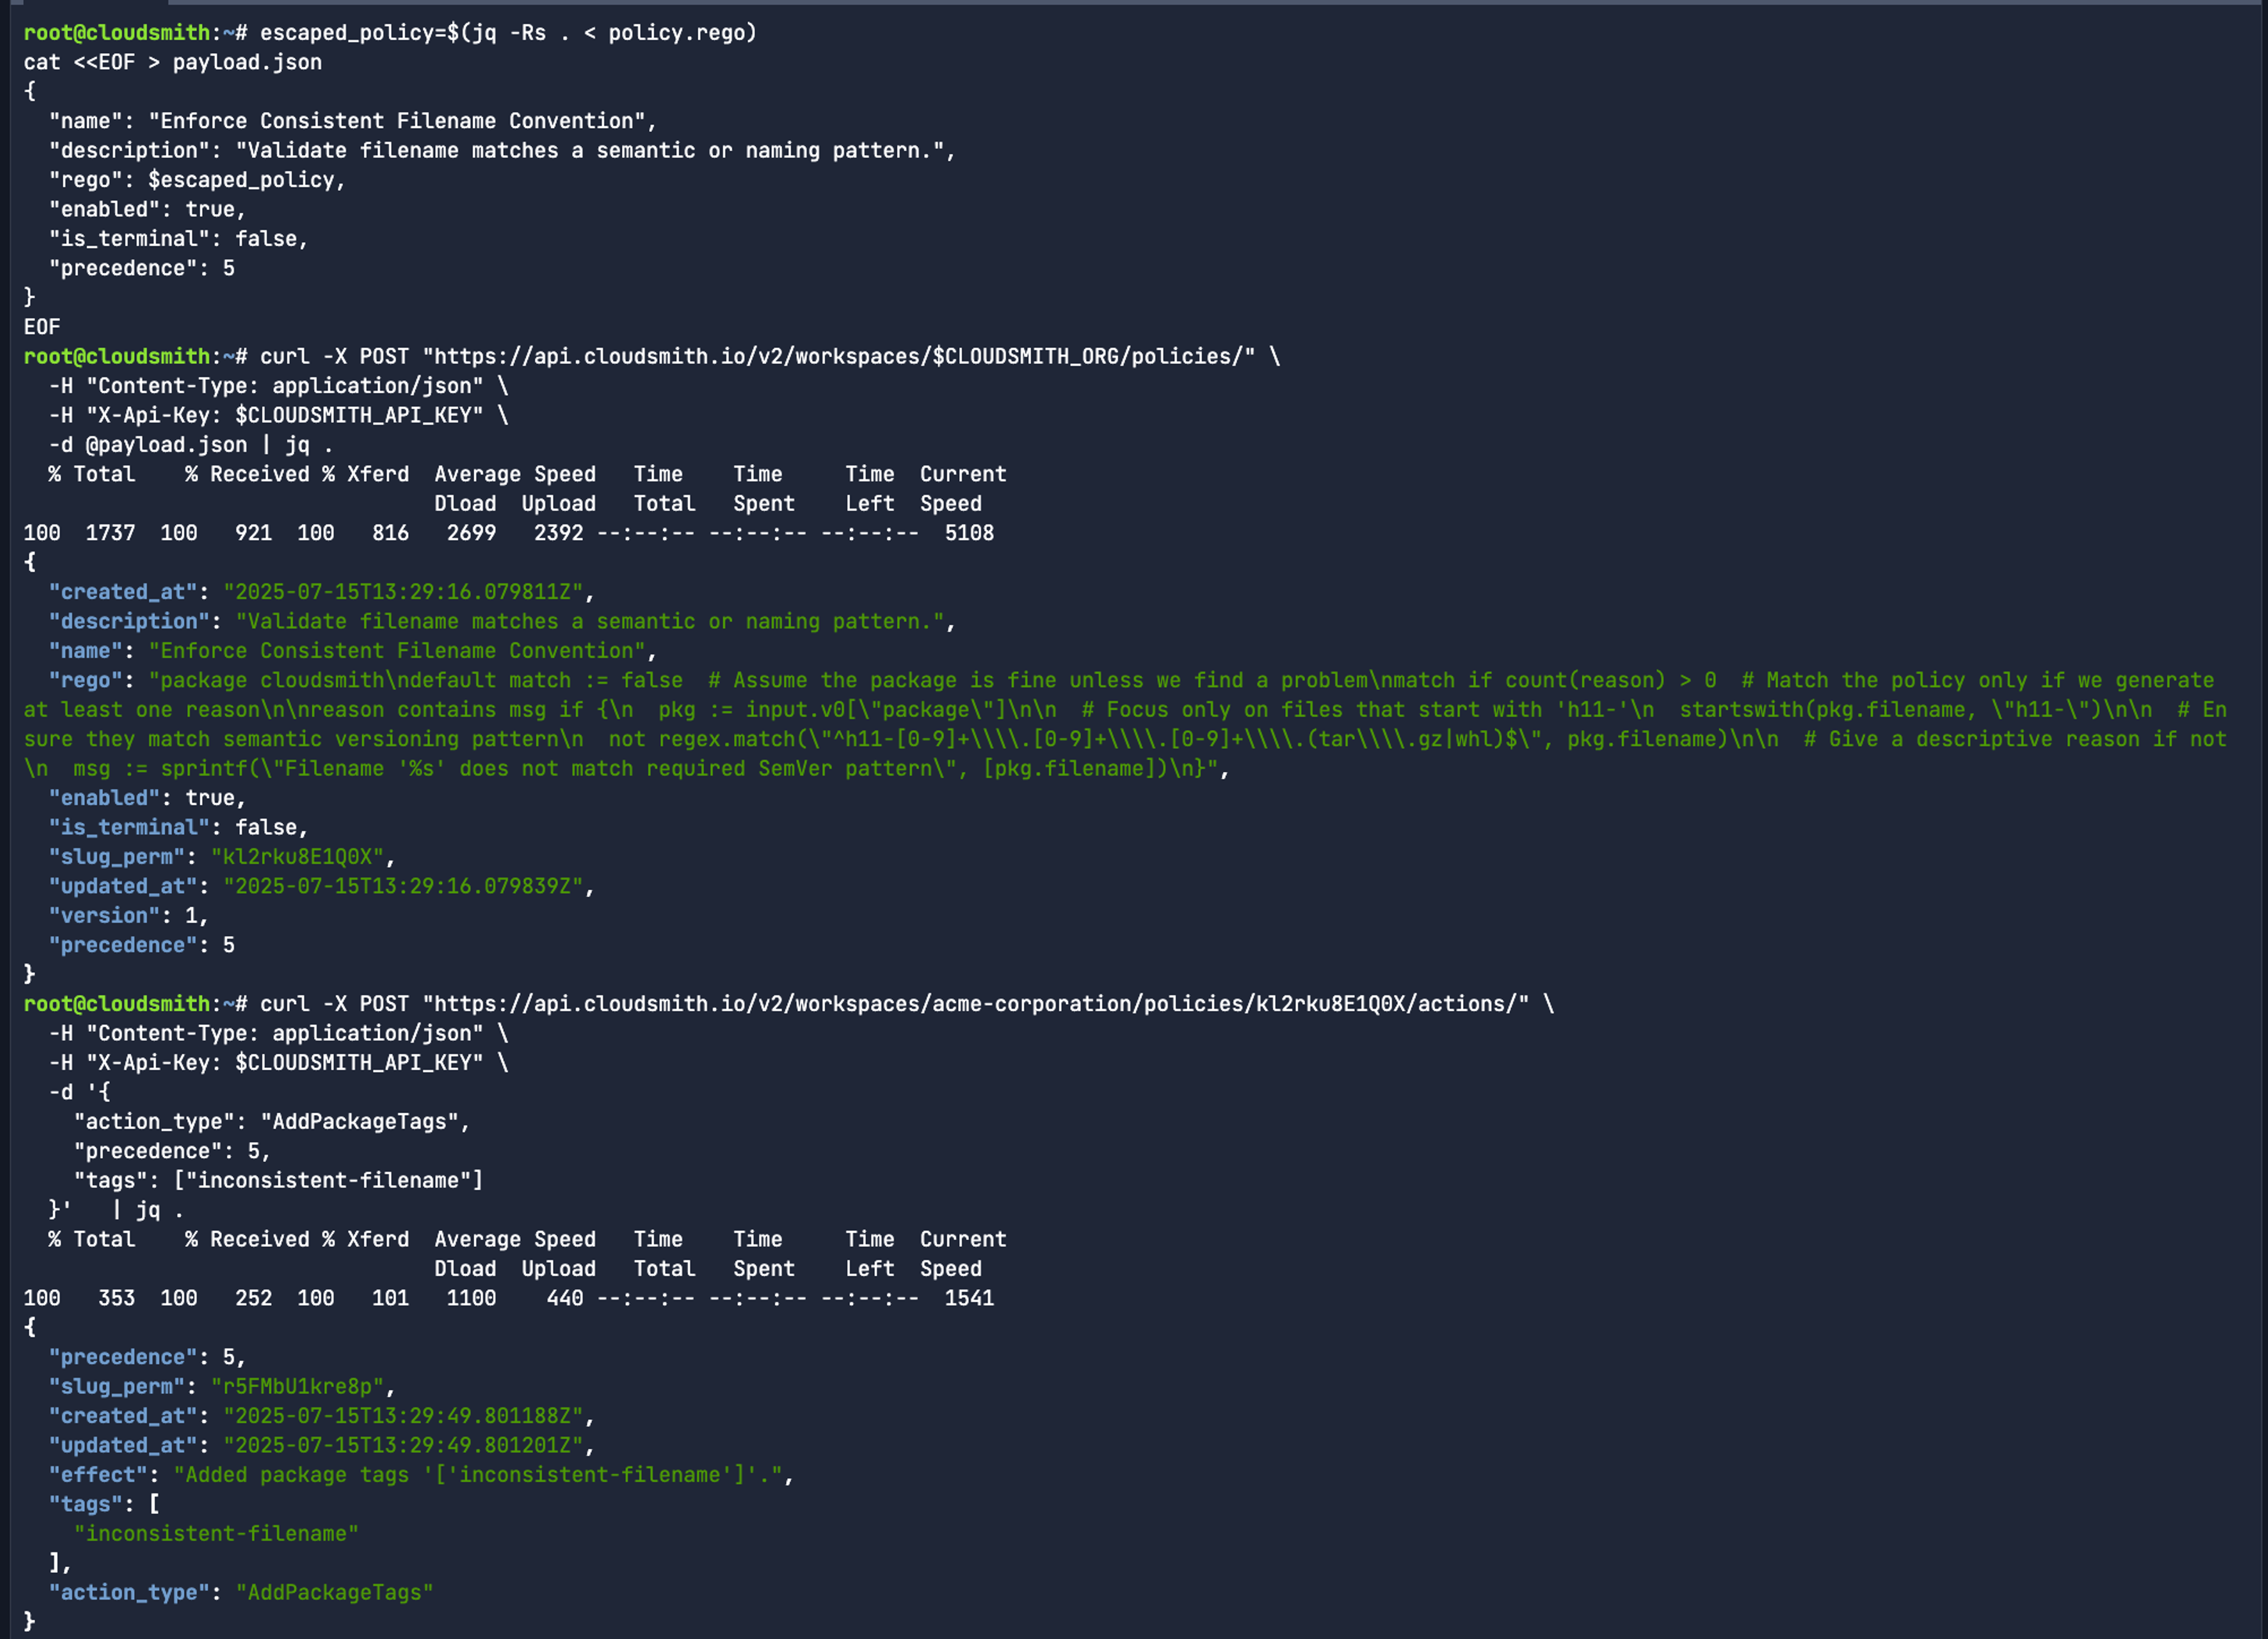
For a Cloudsmith EPM policy to be enforced, it needs an associated payload.json that defines the name and description of the policy, but also whether it’s enabled by default or is terminal, and more importantly defines the precedence at which it’s read:
escaped_policy=$(jq -Rs . < policy.rego)
cat <<EOF > payload.json
{
  "name": "Enforce Consistent Filename Convention",
  "description": "Validate filename matches a semantic or naming pattern.",
  "rego": $escaped_policy,
  "enabled": true,
  "is_terminal": false,
  "precedence": 5
}
EOF
Upon creation, the API returns a success response indicating the policy has passed validation and is active. The policy is also reflected in the Cloudsmith UI almost instantaneously, ensuring immediate visibility and enforceability within your package governance workflows.


Terminal behaviours matter, and this design is intentional. It allows users to short-circuit processing for high-priority rules, as well as avoiding conflicting actions across multiple policies and keep policy logic simple and predictable.
To apply the policy, you can create a HTTP POST request to the policies API with the payload.json reflecting the data that is being sent to that API:
curl -X POST "https://api.cloudsmith.io/v2/workspaces/$CLOUDSMITH_WORKPLACE/policies/" \
  -H "Content-Type: application/json" \
  -H "X-Api-Key: $CLOUDSMITH_API_KEY" \
  -d @payload.json | jq .
While terminal behaviour is the default, non-terminal policies can be configured explicitly by setting:
"terminal": falseThis lets evaluation continue to the next policy, even after a match. You can use this when you want multiple policies to apply, if you're using multiple independent tagging or analysis rules, or if you need layered enforcement, like tagging, then quarantining.
Custom Actions:
You can define actions like SetPackageState (to Quarantine package and render them unusable) or AddPackageTags (with context for further reviews) via the API. Each policy can have multiple actions with a defined precedence. Once you have a Policy Slug generated from the created Cloudsmith EPM policy, you can assign a tagging action for your policy ID:
curl -X POST "https://api.cloudsmith.io/v2/workspaces/$CLOUDSMITH_WORKPLACE/policies/$SLUG_PERM/actions/" \
  -H "Content-Type: application/json" \
  -H "X-Api-Key: $CLOUDSMITH_API_KEY" \
  -d '{
    "action_type": "AddPackageTags",
    "precedence": 5,
    "tags": ["inconsistent-filename"]
  }'   | jq .
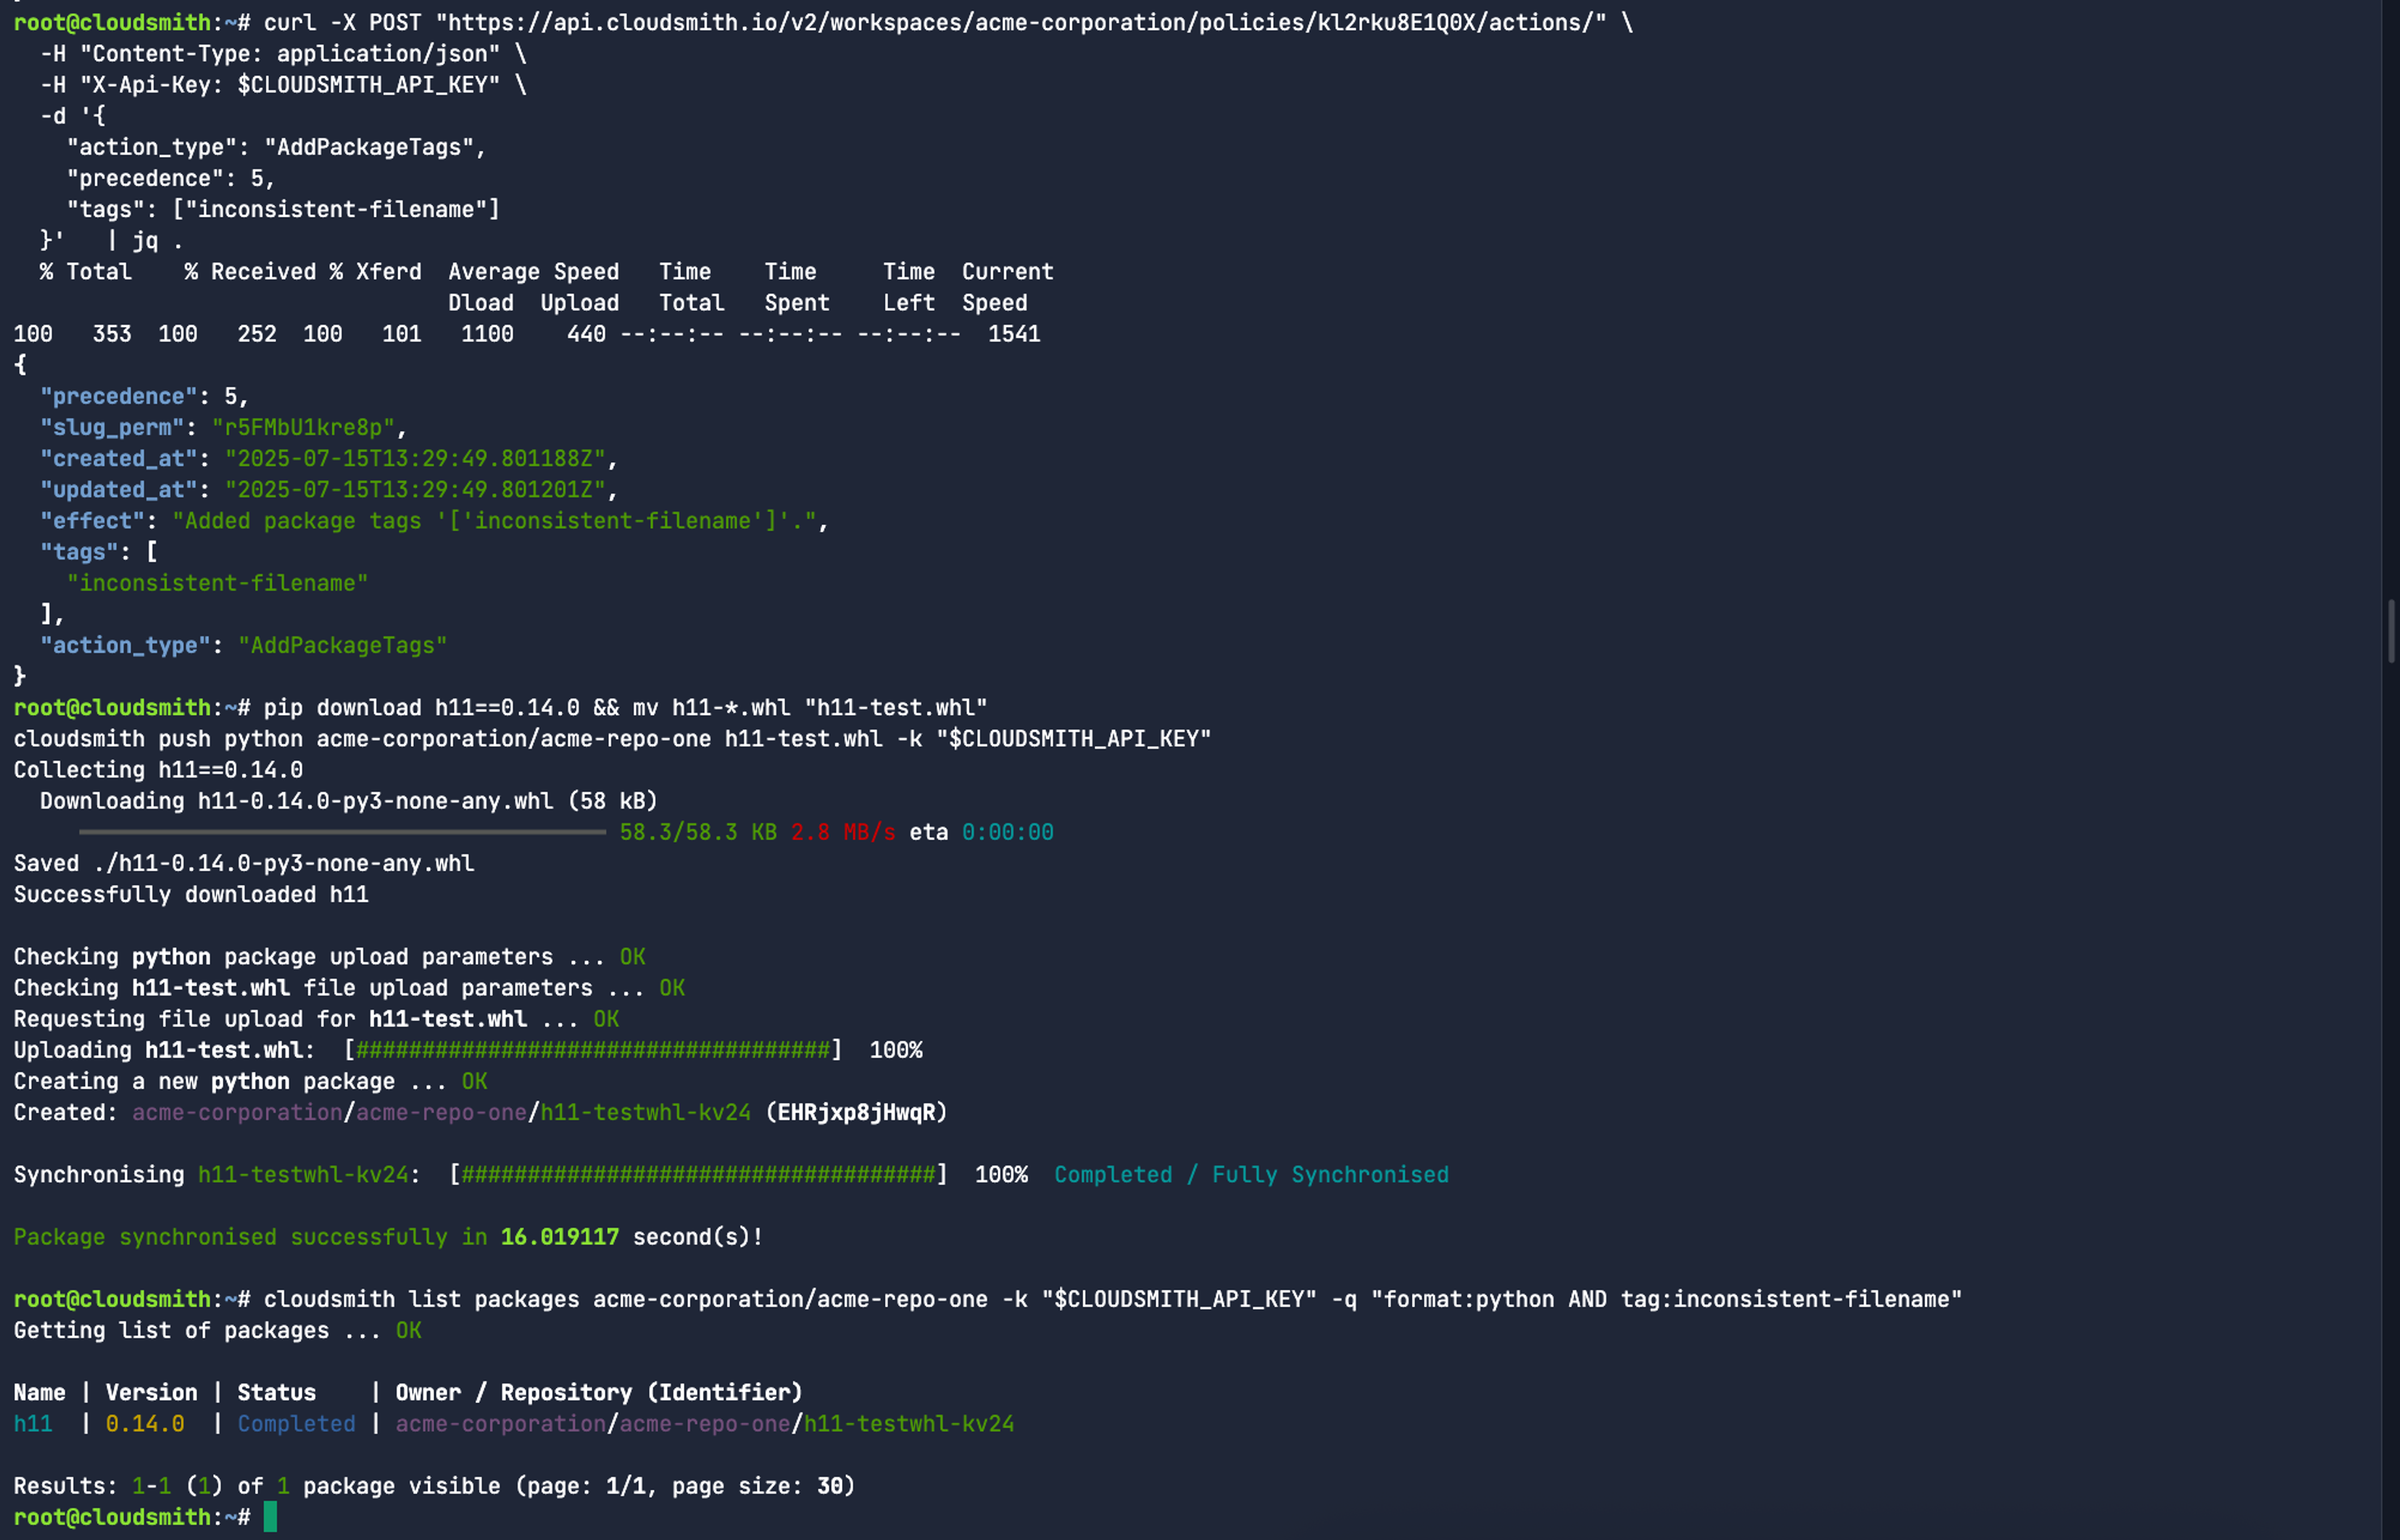
A straightforward way to test this policy is to take a package that already has a valid SemVer-compliant filename and rename it by replacing the version number with a placeholder like “test.” For example:
pip download h11==0.14.0 && mv h11-*.whl "h11-test.whl"

cloudsmith push python acme-corporation/acme-repo-one h11-test.whl -k "$CLOUDSMITH_API_KEY"

Full Lifecycle Control via API
Cloudsmith's REST API enables full Create, Read, Update, Delete (CRUD) operations on policies and their components. This is where automation shines:
- Create or update policies dynamically from CI/CD scripts.
- Simulate policy evaluations with real or staged package metadata.
- Apply tagging or quarantining logic that integrates with your observability or DFIR tools.
GitHub Actions is currently the best fit for automating Cloudsmith EPM policies due to its flexibility in shell scripting (such as jq and curl). Github Actions also provides an easy integration with rego files stored in your repo, secure handling of secrets such as the API Key, as well as built-in CI/CD lifecycle for validation, simulation, and deployment.
Simulation First, Enforcement Second
We recommend using the simulation API endpoint before applying policies in production. This dry-run capability helps ensure your Rego logic behaves as expected, reducing the risk of false positives, which could result in things like blocking good artifacts.
The response contains a list of packages that were tested, with fields like match: true/false, any reason messages, and the associated actions that would be taken if the policy is enabled. You can add a package search query to filter the packages being evaluated. This reduces all the packages to apply the policy to.
curl -s -X GET "https://api.cloudsmith.io/v2/workspaces/$CLOUDSMITH_WORKPLACE/policies/$SLUG_PERM/simulate/?package_query_string=repository:acme-repo-one+name:h11" \
-H "X-Api-Key: $CLOUDSMITH_API_KEY" | jq
You can disable the policy either on policy creation, or at a later time via the API, as seen here:
curl -X PATCH "https://api.cloudsmith.io/v2/workspaces/$CLOUDSMITH_WORKPLACE/policies/$SLUG_PERM/" \
  -H "Content-Type: application/json" \
  -H "X-Api-Key: $CLOUDSMITH_API_KEY" \
  -d '{"enabled": false}'  | jq .
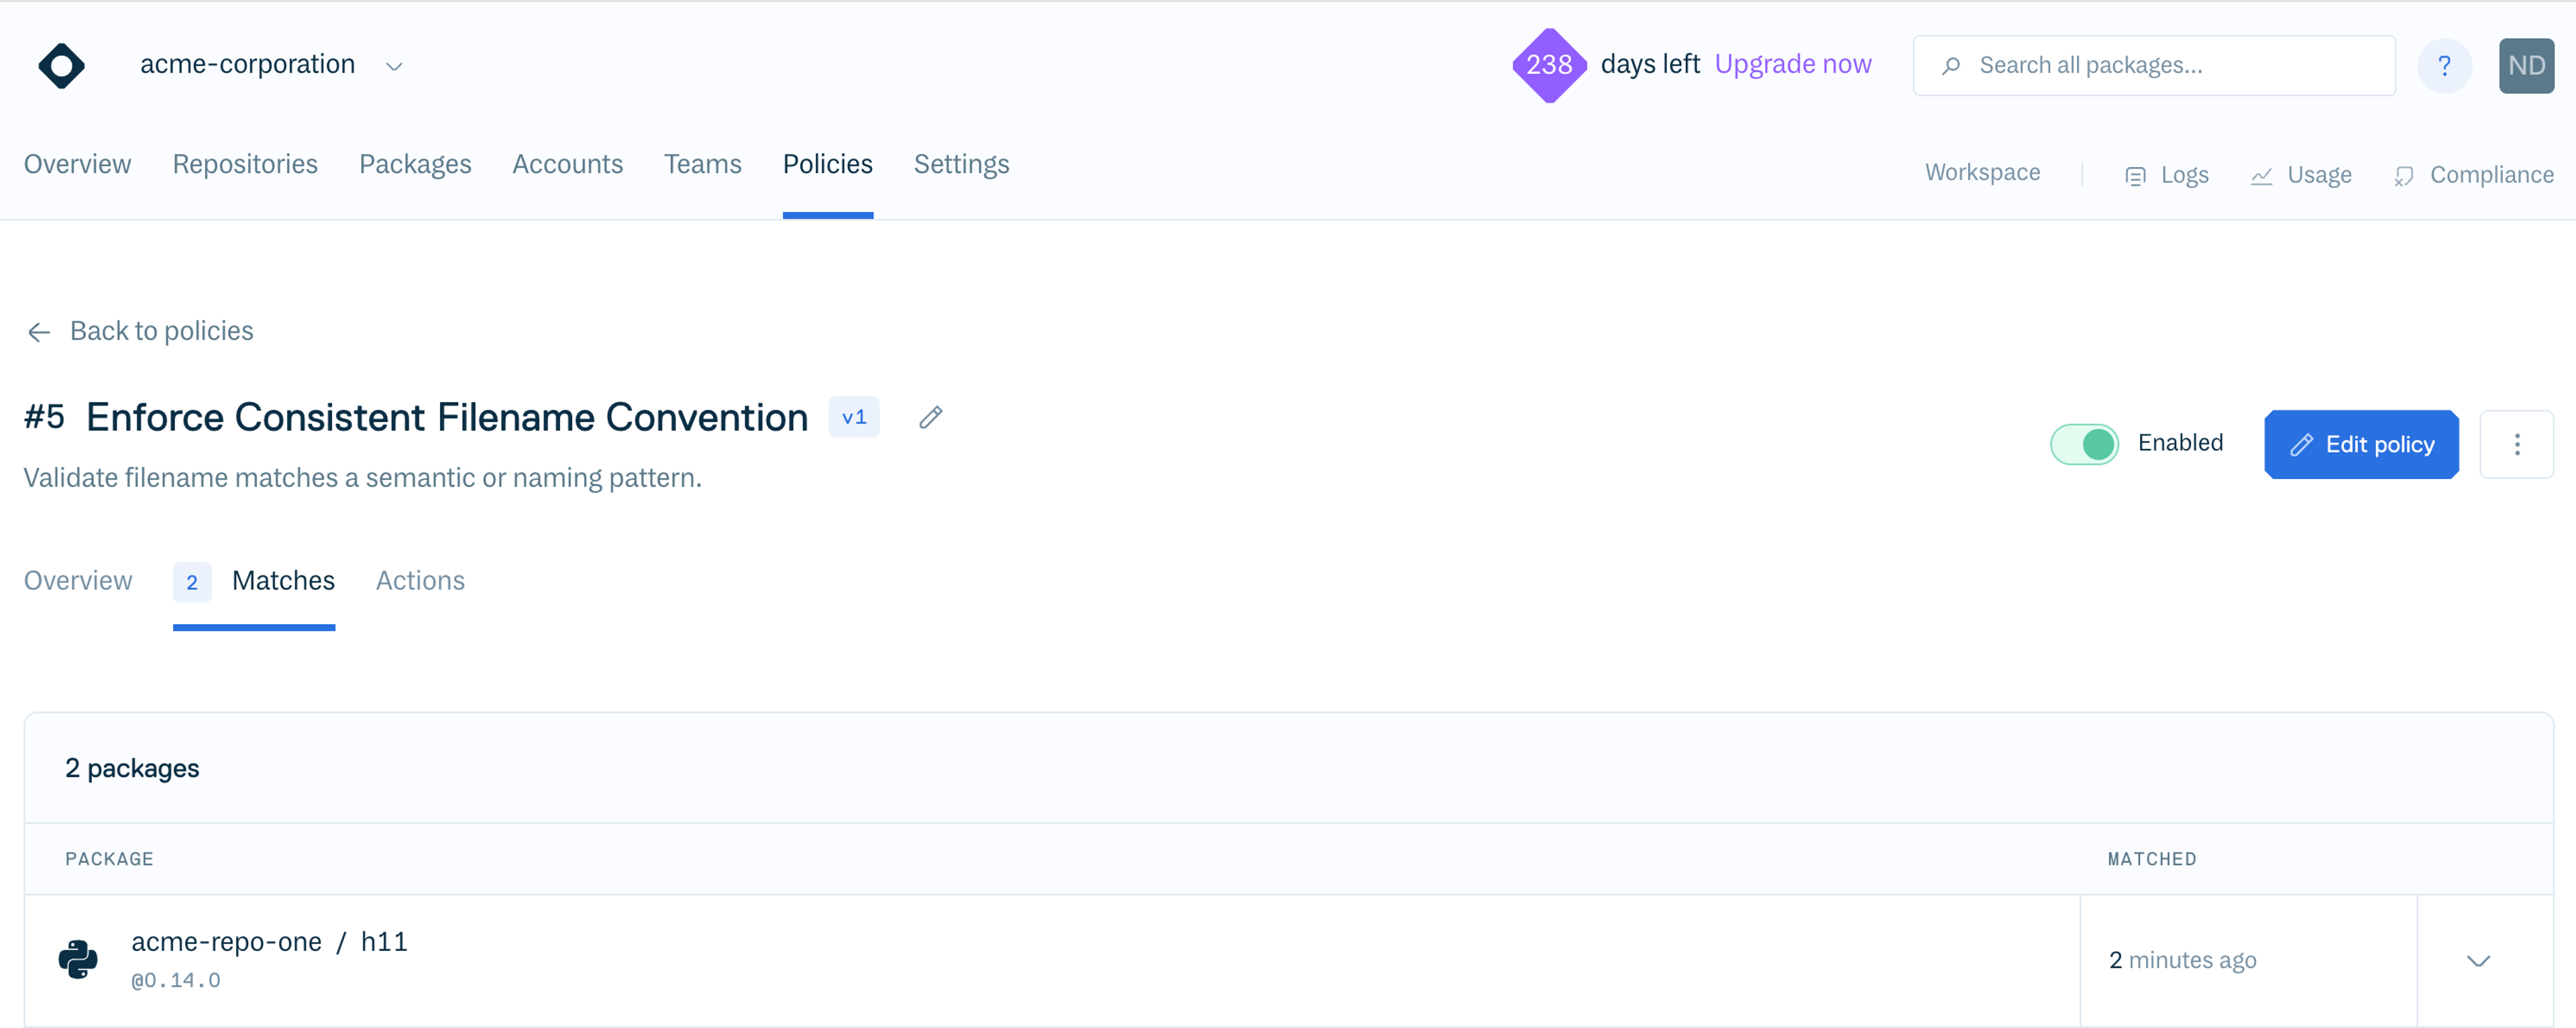
If the policy is already enabled, the decision log will tell users whether the policy matched the scope of their package:
curl -X GET \
"https://api.cloudsmith.io/v2/workspaces/$CLOUDSMITH_WORKPLACE/policies/decision_logs/?policy=$SLUG_PERM" \
  -H "Accept: application/json" \
  -H "X-Api-Key: $CLOUDSMITH_API_KEY" | jq .
Once the package is pushed to Cloudsmith, you can check your h11 package name to see if the package data is the data you expected to see in the policy evaluation:
curl -s --request GET \
  --url https://api.cloudsmith.io/packages/$CLOUDSMITH_WORKPLACE/$CLOUDSMITH_repo/ \
  --header 'Authorization: Bearer 755785563785563879878556378556377855635' \
  | jq '.[] | select(.name=="h11")'
If the policy is no longer required, you can use the DELETE API request:
curl -X DELETE "https://api.cloudsmith.io/v2/workspaces/$CLOUDSMITH_WORKPLACE/policies/$SLUG_PERM/" \
  -H "X-Api-Key: $CLOUDSMITH_API_KEY"
Your policy, your pipeline
By combining EPM with Cloudsmith's flexible REST API, you unlock a powerful new paradigm:
- Governance that’s automated and programmable.
- Standards that are open and inspectable.
- Policies defined by your logic, your rules.
With Cloudsmith, developers and platform engineers can treat security and compliance as first-class, automated citizens in their CI/CD systems. Whether you’re integrating with Terraform, GitHub Actions, or your own orchestration tooling, Cloudsmith EPM gives you the control you need to secure your software supply chain your way.
More articles


Unlocking policy-as-code automation with Cloudsmith EPM

Pull back the hood on the data and tech that informs EPM

Compliance policies in EPM
By submitting this form, you agree to our privacy policy
